
In the landscape of complex system architecture, clarity is the most valuable currency. As systems grow in size and distributed nature, the need for standardized modeling becomes critical. A Profile Diagram serves as a foundational element in this ecosystem, allowing architects to extend modeling languages without altering the core metamodel. This guide provides a structured approach to understanding, creating, and maintaining Profile Diagrams. You do not need years of experience to begin. With a focused approach, you can grasp the essentials and apply them effectively within your next project cycle. ⚙️
What is a Profile Diagram? 🤔
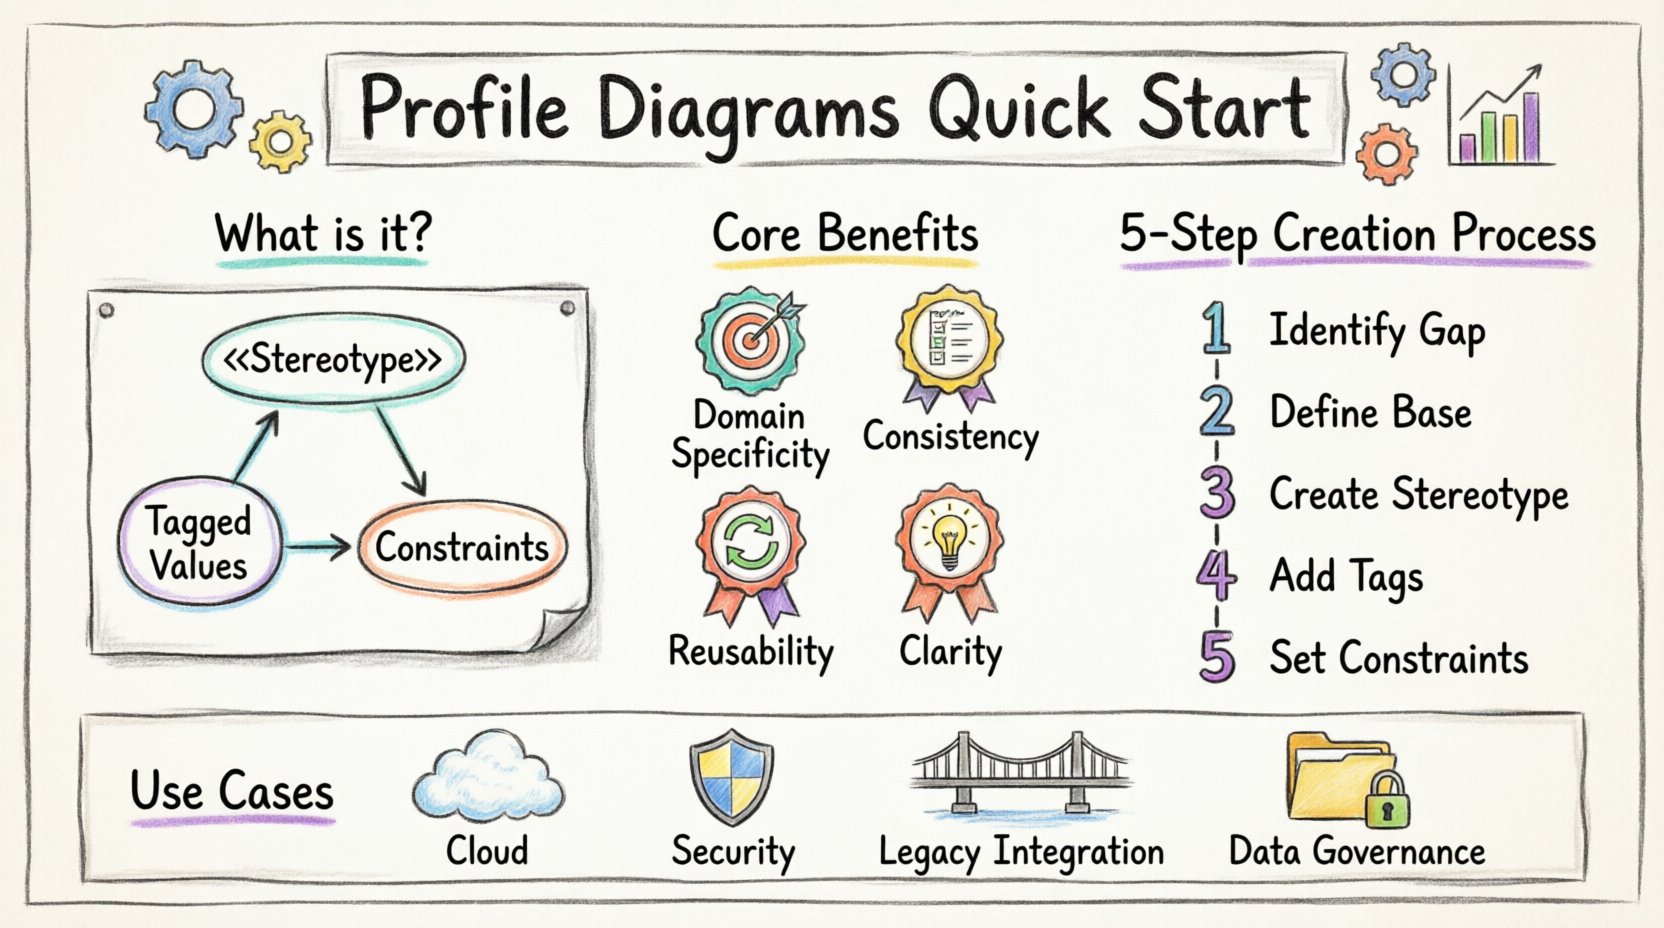
A Profile Diagram is a specialized type of diagram used in systems modeling to define a set of extensions to an existing modeling language. Think of it as a vocabulary builder. Standard modeling languages have a fixed set of shapes and connectors. However, specific domains often require specific terminology that the base language does not provide. A Profile Diagram allows you to create new stereotypes, constraints, and tagged values that fit your specific domain context.
For example, if you are modeling a financial system, the standard shapes might not adequately represent a “Compliance Check” or a “Transaction Ledger”. A Profile Diagram lets you define these as specific types of elements. This ensures that everyone on the team speaks the same language when discussing the architecture. It reduces ambiguity and aligns technical documentation with business terminology. 📊
Core Benefits
- Domain Specificity: Tailor the model to the industry or business logic.
- Consistency: Enforce naming conventions and structural rules across the project.
- Reusability: Define a profile once and apply it to multiple diagrams.
- Clarity: Reduce cognitive load for stakeholders by using familiar terms.
Understanding the Anatomy of a Profile 🧩
To build an effective Profile Diagram, you must understand its internal components. These elements work together to extend the capabilities of the base modeling language. Below is a breakdown of the primary constituents.
1. Stereotypes
Stereotypes are the core building blocks of a profile. They allow you to create new types of elements based on existing base elements. For instance, you might create a stereotype called <<Service>> based on a standard class element. This tells the viewer that this class is not just data storage, but a functional service within the architecture.
2. Tagged Values
Tagged values allow you to attach specific properties or metadata to stereotypes. This is crucial for storing information that standard attributes cannot hold. For example, a <<Database>> stereotype might have a tagged value for RetentionPeriod or EncryptionLevel. This embeds critical operational data directly into the model.
3. Constraints
Constraints define rules that must be followed when the stereotype is used. They act as guardrails for the model. A constraint might specify that a specific type of service must always connect to a load balancer. This ensures architectural integrity without requiring manual checks during the review process. 🛡️
Step-by-Step Creation Process 📝
Building a profile diagram does not require a steep learning curve. Follow this logical sequence to ensure your definitions are robust and usable.
Step 1: Identify the Gap
Before drawing anything, analyze your current diagrams. What terms are being used inconsistently? What concepts are missing from the standard notation? Document these gaps. If you find yourself constantly writing notes to explain a box, that box likely needs a stereotype.
Step 2: Define the Base Element
Determine which standard element the stereotype will extend. Common bases include Class, Component, Node, or Interface. The base element provides the structural foundation. Choosing the correct base is vital for inheritance and behavior. If you extend a Component, you inherit its connectivity rules. If you extend a Class, you inherit its attribute rules.
Step 3: Create the Stereotype
Define the name of the stereotype. Keep it concise but descriptive. Avoid acronyms that are not universally understood within your team. Use the standard notation prefix and suffix (e.g., <<Name>>). This visual cue helps readers instantly recognize the custom element.
Step 4: Add Tagged Values
List the metadata that is essential for this element type. Ask yourself: What information do I need to know about this element to operate it? Add these as tagged values. Ensure they have defined types, such as String, Integer, or Boolean, to prevent data entry errors. 🔧
Step 5: Establish Constraints
Write the rules that govern the usage of the stereotype. Use clear, formal language. If the tool supports Object Constraint Language (OCL), utilize it. Otherwise, write plain text constraints that are unambiguous. This step is often skipped, but it is what separates a casual diagram from a rigorous architectural artifact.
Common Use Cases and Patterns 🌐
Profile diagrams are versatile. They can be applied to various domains and system layers. Below are common scenarios where they add significant value.
Cloud Architecture
In cloud environments, resources are abstracted. A profile can define specific types of cloud resources, such as <<ComputeInstance>> or <<StorageBucket>>. This allows architects to map logical requirements directly to cloud constructs without confusing the underlying infrastructure details.
Security Modeling
Security requirements often cut across multiple layers. A security profile can define <<ProtectedInterface>> or <<AuthZone>>. These stereotypes ensure that security boundaries are visible in the diagram. Tagged values can specify authentication methods or compliance standards required for that zone. 🔒
Legacy Integration
When integrating older systems with modern platforms, terminology often clashes. A profile can bridge this gap by mapping legacy terms to modern constructs. This preserves historical context while enabling new development to proceed with updated standards.
Data Governance
For systems handling sensitive data, a data profile can define <<PII>> or <<EncryptedData>>. This makes compliance requirements visible at the architectural level. Auditors can quickly verify that all sensitive elements are marked correctly. 📋
Comparison of Profile Elements
To help visualize the differences between the components, refer to the table below.
| Component | Purpose | Example |
|---|---|---|
| Stereotype | Defines a new type of element | <<API>> |
| Tagged Value | Stores metadata properties | ResponseTime = 200ms |
| Constraint | Enforces structural rules | Must connect to LoadBalancer |
| Base Element | The standard element being extended | Class, Component, Node |
Best Practices for Clarity and Maintenance ✨
Creating a profile is only the first step. Maintaining it over time ensures it remains useful. Follow these guidelines to keep your diagrams effective.
- Keep it Simple: Do not create a stereotype for every minor variation. If you need 50 stereotypes, your model is likely too complex. Group similar concepts together.
- Document the Profile: Include a legend or a separate document explaining the profile. New team members need to understand what each stereotype means before they can use it.
- Version Control: Treat the profile as code. Track changes to stereotypes and constraints. If a constraint changes, notify the team immediately to avoid confusion.
- Consistent Naming: Use a consistent naming convention for all stereotypes. Avoid mixing languages or abbreviations. Clarity is more important than brevity.
- Review Regularly: Schedule quarterly reviews of the profile. Remove unused stereotypes and update constraints based on new architectural standards.
Common Pitfalls to Avoid ⚠️
Even experienced modelers can make mistakes when defining profiles. Be aware of these common traps.
Over-Engineering
Creating a profile for every possible scenario leads to a bloated model. Only define stereotypes that solve a real problem. If a standard shape works, use it. Do not force a custom shape where a generic one suffices.
Ambiguous Constraints
Constraints must be actionable. Vague rules like “Ensure security” are not helpful. Specific rules like “Enable TLS 1.2” are. Ambiguity leads to inconsistent implementations across the system.
Ignoring the Base Model
Ensure that the base element you extend supports the features you need. Extending a static element to hold dynamic behavior will cause confusion. Match the stereotype to the appropriate base type.
Lack of Adoption
A profile is useless if the team does not use it. Train the team on how to apply the profile. Make the creation of stereotypes easy within the workflow. If it is hard to use, people will revert to standard shapes.
Integrating with Other Diagrams 🔄
A Profile Diagram does not exist in isolation. It supports other diagrams in the suite. Here is how it interacts with common diagram types.
Use Case Diagrams
Use profiles to extend actor types. You can define <<ExternalUser>> or <<InternalAdmin>>. This clarifies the role and permissions of each actor without cluttering the diagram with text descriptions.
Component Diagrams
Profiles are most frequently used here. They define the nature of the components. A <<Frontend>> component behaves differently than a <<Backend>> component. The profile makes this distinction explicit in the visual model.
Sequence Diagrams
Profiles can define the type of messages or objects involved in a sequence. This helps in understanding the data flow and state changes. Tagged values can specify timeout limits or retry policies for interactions.
Evolution and Long-Term Strategy 📈
Architectural models evolve as the system evolves. Your profile must evolve with it. Do not treat the profile as a static document. It is a living specification.
When a new technology is introduced, update the profile to include relevant stereotypes. When an old technology is retired, remove the corresponding stereotypes to prevent accidental usage. This keeps the model clean and relevant. Regular audits are essential. Check for orphaned stereotypes that are no longer used in the diagrams. Remove them to reduce cognitive load.
Consider creating a library of profiles for different domains. If your organization works on both web and embedded systems, maintain separate profiles for each. This prevents cross-contamination of concepts. A profile for embedded systems might focus on hardware constraints, while a web profile focuses on network latency.
Final Thoughts on Implementation 💡
Implementing a profile diagram strategy requires discipline. It is not about adding complexity; it is about managing it. By defining clear stereotypes and constraints, you create a shared language for your team. This reduces errors and speeds up development. The investment in setting up the profile pays off in the clarity of the resulting documentation.
Start small. Define one or two key stereotypes. Test them in a single diagram. Gather feedback. Iterate. This gradual approach minimizes risk and ensures the profile meets the actual needs of the team. With patience and attention to detail, you can build a robust modeling framework that supports your architecture for years to come. 🛠️
Remember that the goal is communication. If the diagram helps you explain the system to a stakeholder, it is doing its job. If it confuses them, revisit the definitions. The profile is a tool for understanding, not a test of technical knowledge. Keep it accessible, keep it consistent, and keep it useful.
As you move forward, continue to refine your approach. Look for opportunities to automate profile validation where possible. Ensure that the metadata you capture is accessible for reporting and analysis. The more data you can extract from the model, the more value the profile provides. This transforms the diagram from a static picture into a dynamic resource for the organization.