
Introduction: Why I Decided to Try Visual Paradigm (And What I Wish I’d Known Day One)
Hey there, fellow diagram enthusiast! 👋
If you’re reading this, chances are you’ve just downloaded Visual Paradigm and are staring at your screen wondering, “Okay… now what?” I’ve been there. As someone who’s tried nearly every UML tool under the sun—from free open-source options to enterprise suites—I decided to give Visual Paradigm a serious spin for a recent system design project. What followed was a mix of “wow, that’s smooth” moments and a few “wait, how do I…?” hiccups.
This guide isn’t official documentation (you can find that on their site). Instead, it’s my real-world, coffee-fueled walkthrough of launching, activating, and setting up Visual Paradigm for the first time—written from the perspective of someone who just wants to start modeling without wrestling with licenses or config files. Let’s dive in.

🚀 Step 1: Launching Visual Paradigm – It’s Easier Than You Think
When I first installed Visual Paradigm on my Windows 11 machine, I honestly expected to dig through folders for ages. Surprise: it was straightforward.
-
Windows users: Just hit your Start menu and search “Visual Paradigm.” If you skipped the Start menu shortcut during install (no judgment—I sometimes declutter mine too), navigate to your installation folder (typically
C:\Program Files\VisualParadigm\) and double-click Visual Paradigm.exe inside thebinfolder. -
Mac users: Like most macOS apps, just open your Applications folder and double-click the Visual Paradigm icon. Clean and simple.
-
Linux users: The installer usually drops a desktop shortcut. If not, you can launch via terminal using the startup script in the installation directory.
💡 Pro tip from my experience: Pin the app to your taskbar or dock after first launch. You’ll thank yourself later when you’re deep in a modeling session and need to switch windows quickly.
🔑 Step 2: The Activation Screen – Don’t Panic, Pick Your Path
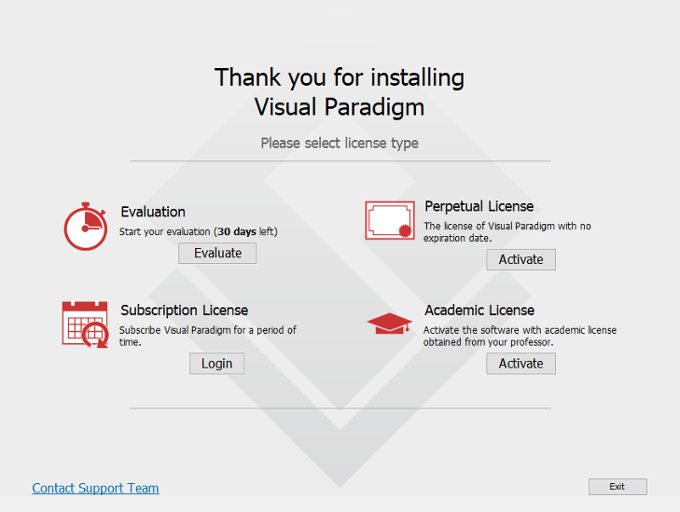
The very first time you launch Visual Paradigm, you’ll see the License Key Manager. This is where many new users (myself included on day one!) pause and wonder which option to choose. Here’s how I broke it down:
🎯 Option A: “Just Let Me Try It” → 30-Day Free Evaluation
If you’re like me and want to test-drive before committing, click Evaluate. No email, no code—just instant access to nearly all features for 30 days. Perfect for proof-of-concept work or learning the interface.
💼 Option B: I Bought a License → Perpetual or Subscription
If you’ve purchased a license:
-
Perpetual License (Single Seat): Click Activate, then enter your activation code, name, and email. I grabbed my code from the confirmation email Visual Paradigm sent post-purchase. Note: You can activate on both your desktop and laptop, as long as you’re the only user and only one instance runs at a time.
-
Floating License: Expand the Floating License section and input your license server’s connection details. This is common in team/enterprise setups.
-
Subscription License: Click Login under Subscription License, then sign in with your Visual Paradigm customer account credentials.
 |
|---|
| The activation screen I saw on day one – straightforward once you know which path fits your needs. |
🎓 Option C: Academic/User Community Edition
-
Academic License: If you’re part of an academic program, click Activate under Academic License, enter your code from the Academic Training Partner Portal, then verify via the code emailed to you.
-
Community Edition (Free): Not mentioned prominently on the activation screen, but if you register for a free account on their site, you’ll receive an activation code for the feature-limited (but still powerful) Community Edition. Great for students or hobbyists.
⚠️ My hiccup moment: I initially tried activating my perpetual license offline and got stuck. More on that fix below!
🌐 Offline Activation? Here’s the Workaround That Saved Me
During a flight with no Wi-Fi, I attempted to activate Visual Paradigm on my laptop. The software gracefully detected no internet and offered an Offline Activation path. Here’s what worked for me:
-
Copy the unique URL shown in the activation window.
-
On a different device with internet access, paste that URL into a browser.
-
Download the generated key code file.
-
Transfer it back to your offline machine (USB, email, whatever works).
-
Paste the code into the activation window and click OK.
It took about 5 minutes total. Not instant, but totally manageable—and way better than being locked out mid-project.
⚙️ Step 3: Initial Setup – Workspace & First Impressions
After activation, Visual Paradigm prompted me to select a Workspace. This is the local folder where all your projects, diagrams, and settings live.
🗂️ My recommendation: Create a dedicated folder like
C:\Users\YourName\VP_Workspaceor~/VisualParadigm_Projects. Avoid cloud-synced folders (like OneDrive or Dropbox) for active projects—they can cause file-locking issues during saves.
Next, a friendly Welcome/Tips dialog appeared, highlighting key UI areas:
-
Diagram Navigator: Where your diagrams live
-
Model Explorer: For managing model elements hierarchically
-
Toolbar & Palette: Your drawing toolkit
I appreciated that these hints were skippable but helpful for orientation. You can always reopen them later via Help > Tips.
🎨 Step 4: Creating Your First Project – From Zero to Diagram in Minutes
Ready to actually make something? Here’s the workflow that got me from blank screen to my first Use Case Diagram:
-
Go to Project > New in the top menu.
-
Name your project (e.g., “E-Commerce System Model”).
-
In the Diagram Navigator, right-click your project name → Add Diagram → choose a type (Class Diagram, Use Case, Sequence, etc.).
-
Start dragging elements from the palette onto the canvas.
✨ What impressed me: The auto-layout suggestions and real-time validation caught a few modeling mistakes I would’ve missed manually. The interface felt intuitive even without prior VP experience.
🖥️ Special Case: Floating License Users on IPv4 Networks
If you’re connecting to a floating license server and your host uses IPv4, I hit a small snag: Visual Paradigm wouldn’t connect by default. The fix? A quick script edit:
-
Navigate to the
scriptsfolder in your Visual Paradigm installation directory. -
Copy
Visual Paradigm.batand rename it toStartup.bat. -
Edit
Startup.batin a text editor. -
Add this line to the Java command:
-Djava.net.preferIPv4Stack=true -
Save and launch Visual Paradigm using
Startup.batgoing forward.
 |
|---|
| Adding the IPv4 flag to the startup script – a tiny edit that solved my connection issue. |
This took me all of 2 minutes, and after that, my client machine connected to the license server without a hitch.
🧭 What I’d Do Differently Next Time (Lessons Learned)
-
Bookmark your Customer Service Center: Having
cs.visual-paradigm.comhandy saved me when I needed to re-fetch my activation code. -
Test activation on your primary machine first: Don’t wait until you’re offline or traveling to activate.
-
Explore the Welcome Center: It has video tutorials and sample projects that accelerate onboarding.
-
Join the community forum: When I had a niche question about diagram export settings, the VP forums had an answer within hours.
Conclusion: Is Visual Paradigm Worth the Setup Effort?
After a week of daily use, my verdict: Yes—with caveats.
✅ The Good:
-
Activation flows are logical once you know your license type
-
The UI is polished and responsive
-
Offline activation, while not instant, is reliable
-
First-project setup is intuitive for both UML veterans and newcomers
⚠️ Watch Out For:
-
The initial activation screen can feel overwhelming with multiple license paths
-
Floating license IPv4 setup requires a manual script tweak (though well-documented)
-
Community Edition limitations aren’t obvious until you try advanced features
If you’re evaluating modeling tools, I’d recommend starting with the 30-day trial to test the workflow before committing. And if you get stuck? Their support docs are thorough, and the community is active.
For me, Visual Paradigm struck a great balance between power and usability. Now if you’ll excuse me, I’ve got a sequence diagram to finish. 😉
🔗 Reference Resources
- Starting Visual Paradigm – Official User Guide: Step-by-step instructions for launching Visual Paradigm across Windows, Mac, and Linux platforms.
- Visual Paradigm Tutorial for Beginners: A university-hosted PDF tutorial covering basic project setup and diagram creation in Visual Paradigm.
- Install Visual Paradigm on Windows: Official installation guide with screenshots for Windows users.
- Install Visual Paradigm on Mac OS X: Step-by-step macOS installation and launch instructions.
- Install Visual Paradigm on Linux/Unix: Linux-specific installation and startup guidance.
- Visual Paradigm Quick Start Guide (PDF): A concise, printable quick-start reference for new users.
- UML Quick Start with Visual Paradigm: Focused guide for creating UML diagrams rapidly after installation.
- Activate Site License – Know How: Detailed walkthrough for activating site-wide licenses via the Customer Service Center.
- Running Visual Paradigm the First Time: Official documentation covering initial activation workflows and license selection.
- Activate Single Seat License: Instructions for individual perpetual license activation.
- Purchase & Upgrade Support: Guidance on managing licenses, upgrades, and re-activation scenarios.
- Visual Paradigm Beginner Tutorial (Video): A video walkthrough for absolute beginners covering interface navigation and first diagram creation.
- Visual Paradigm Community Edition: Overview of the free Community Edition features and registration process.
- Visual Paradigm Quickstart – Moonsoft: Third-party quick reference highlighting workspace setup and project management tips.
- Workspace Configuration Discussion: Community forum thread discussing workspace locations and integration with development tools.
- Visual Paradigm User Guide Index: Central hub for all Visual Paradigm user documentation sections.
- Working with Projects: Official guide to creating, managing, and organizing projects within Visual Paradigm.
- Build Glossary from Domain Class Model: Tutorial demonstrating how to create a new project and generate documentation from class diagrams.