
Modeling languages like UML and SysML are powerful tools for visualizing complex systems. However, standard diagrams often lack the specificity needed for niche domains. This is where the Profile Diagram becomes essential. A profile diagram acts as an extension mechanism, allowing you to tailor a general-purpose modeling language to fit specific industry requirements without altering the core standard.
In this comprehensive guide, we will explore the anatomy, creation, and application of profile diagrams. We will move from foundational definitions to advanced implementation strategies, ensuring you understand how to extend metamodels effectively.
🔍 What is a Profile Diagram?
A profile diagram is a specialized UML or SysML diagram used to define a profile. A profile is a set of extensions to a metamodel. It allows modelers to add new concepts, properties, and relationships to existing modeling elements. Think of it as a plugin for your modeling language.
- Core Purpose: To specialize a generic language for a specific domain.
- Structure: It typically contains packages, stereotypes, and constraints.
- Dependency: Profiles extend existing metaclasses (like Class, Component, or Node).
Without profiles, every organization would have to invent its own modeling language from scratch. Profiles provide a standardized way to reuse and share these extensions.
🧩 Core Components of a Profile
To understand how a profile diagram works, you must understand its building blocks. These elements define the rules and semantics of the extension.
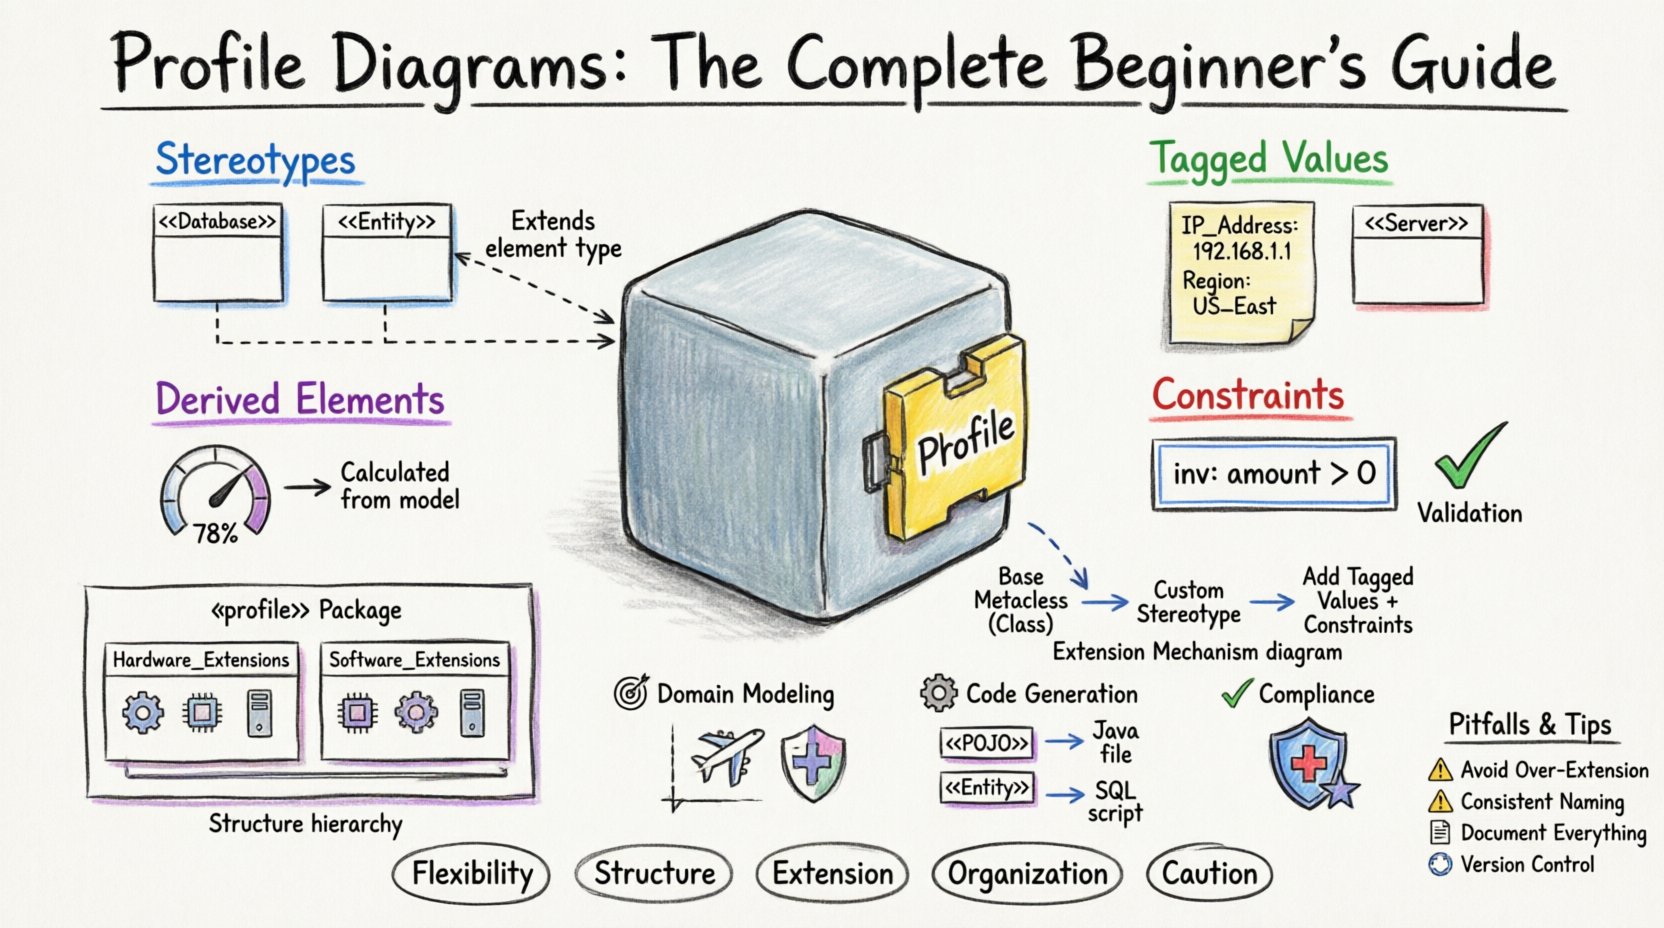
1. Stereotypes
A stereotype is the primary mechanism for extending a metaclass. It allows you to assign a specific meaning to a standard modeling element.
- Example: You might create a stereotype called
<<Database>>and apply it to a standardClasselement. - Visual Representation: In the diagram, stereotypes appear as text enclosed in double angle brackets (e.g.,
<<Entity>>). - Function: It changes how the modeler interprets the element. A Class with this stereotype might trigger different code generation rules.
2. Tagged Values
Tagged values allow you to attach custom properties to stereotypes or other elements. They are similar to attributes but are specific to the profile context.
- Usage: Define metadata that is not part of the core language.
- Data Types: Can be strings, integers, booleans, or enumerations.
- Example: A
<<Server>>stereotype might have a tagged value forIP_AddressorRegion.
3. Constraints
Constraints are rules that restrict the use of an element. They are often expressed using OCL (Object Constraint Language) or similar textual logic.
- Validation: Ensures the model adheres to domain-specific rules.
- Scope: Can apply to relationships, attributes, or entire classes.
- Example: A constraint stating that a
<<CriticalComponent>>cannot be removed without a<<Backup>>.
4. Derived Elements
These are elements that are calculated or derived from other elements within the profile. They do not store data directly but reflect the state of the model dynamically.
📊 Comparison of Profile Elements
Understanding the distinction between these components is vital for designing a clean profile.
| Element | Function | Analogy |
|---|---|---|
| Stereotype | Extends the type of an element | A custom badge on a uniform |
| Tagged Value | Stores custom data | A note attached to the badge |
| Constraint | Enforces rules | The law governing the badge |
| Derived Element | Calculates values | A dynamic display on the uniform |
🛠️ The Extension Mechanism
The technical foundation of a profile diagram lies in the extension mechanism. This is the process by which a profile links its custom definitions to the base metamodel.
Every profile diagram must extend at least one metaclass from the base language (such as UML or SysML). This is achieved through the extends relationship.
How it Works
- Identify Base Metaclass: Select the standard element you wish to extend (e.g.,
Class). - Create Stereotype: Define a new stereotype that inherits from the base metaclass.
- Link Them: Establish the extension relationship. This tells the modeling engine that instances of the stereotype are instances of the base metaclass.
- Add Semantics: Attach tagged values or constraints to the stereotype.
This mechanism ensures backward compatibility. Tools that understand the base language can still interpret the profiled elements, while tools that understand the profile can utilize the new semantics.
🏗️ Structuring a Profile Diagram
A well-organized profile diagram is crucial for maintainability. It should follow a logical hierarchy.
1. The Profile Package
The root of your profile is a package labeled with the stereotype <<profile>>. This package contains all the definitions related to the extension.
- Visibility: It should be clearly marked to distinguish it from regular model packages.
- Import: It often imports the standard UML/SysML packages to ensure metaclasses are available.
2. Namespace Organization
Large profiles can become cluttered. Use nested packages to organize stereotypes by category.
- Example Structure:
Profile_Name- └──
Hardware_Extensions - └──
<<Processor>> - └──
<<Sensor>> - └──
Software_Extensions - └──
<<Service>>
3. Relationships
Use generalization to create hierarchies within stereotypes. For instance, a <<Device>> stereotype might be a parent to <<Sensor>> and <<Actuator>>.
🚀 Advanced Concepts
Once you are comfortable with the basics, you can explore more sophisticated uses of profile diagrams.
Nested Profiles
Sometimes, a domain requires multiple layers of specialization. You can nest profiles within profiles. This is useful for large-scale systems where different teams manage different layers of abstraction.
- Layer 1: Generic System Layer.
- Layer 2: Domain Specific Layer (e.g., Automotive).
- Layer 3: Vendor Specific Layer.
Profile Application
A profile diagram defines the rules, but you must apply the profile to a model to use it. This is done by referencing the profile package in your main model.
- Activation: Once applied, the new stereotypes become available in your palette.
- Propagation: Changes to the profile definition should propagate to all models using it.
Constraint Language Integration
For complex logic, integrate constraint languages like OCL. This allows you to write mathematical rules directly within the profile.
- Example:
context: <<Transaction>> inv: amount > 0 - Benefit: Automated validation during model editing.
💼 Practical Use Cases
Why go through the effort of creating a profile? Here are scenarios where they provide significant value.
1. Domain Specific Modeling (DSM)
Industries like aerospace, healthcare, and finance have unique terminology and rules. Profiles allow you to create a DSM language that speaks the language of the engineers.
- Benefit: Reduced cognitive load for stakeholders.
- Result: Fewer errors in translation between requirements and design.
2. Code Generation Templates
Many modeling environments use profiles to drive code generation. By tagging elements with specific stereotypes, you can instruct the generator to produce specific code structures.
- Example: Tagging a class as
<<POJO>>generates a Java class without persistence logic. - Example: Tagging as
<<Entity>>generates database table creation scripts.
3. Compliance and Standards
Regulated industries often require specific modeling standards. Profiles can enforce these standards by restricting how elements can be connected or labeled.
- Example: Military standards for hardware reliability.
- Example: Medical device safety constraints.
🛑 Common Pitfalls to Avoid
Creating a profile is not without risks. Poor design can lead to confusion and maintenance headaches.
1. Over-Extension
Do not create a stereotype for every single variation. If you extend the language too much, it loses its connection to the base standard.
- Rule of Thumb: Only extend when the base language cannot express the concept clearly.
2. Inconsistent Naming
Ensure naming conventions are consistent across the profile. Mixing camelCase, snake_case, and PascalCase makes the profile hard to read.
3. Ignoring Tool Support
Different modeling tools handle profiles differently. Ensure your profile is compatible with the software your team uses.
4. Lack of Documentation
A profile is only as good as the documentation explaining it. If users do not know what <<Critical>> means, the profile fails.
✅ Best Practices for Maintenance
Once a profile is in use, it becomes a critical asset. Treat it with care.
- Version Control: Treat profile definitions as code. Use version control systems to track changes.
- Change Management: Do not alter existing stereotypes without communicating the impact to all users.
- Modularity: Split large profiles into smaller, reusable packages where possible.
- Validation: Regularly run validation checks to ensure the profile has not introduced logical errors.
🔗 Integrating with Requirements
One of the most powerful uses of profiles is linking models to requirements. You can create a profile specifically designed to map design elements to requirement IDs.
Steps for Requirement Linking
- Define a stereotype
<<Requirement>>. - Add a tagged value
ID(String) andStatus(Enum). - Define a stereotype
<<Refines>>relationship. - Apply the stereotype to elements in the model.
- Trace the relationship to the requirement management system.
This creates a bidirectional traceability link without needing external plugins.
🌟 Summary of Key Takeaways
- Flexibility: Profile diagrams allow you to customize UML/SysML for specific needs.
- Structure: They consist of Stereotypes, Tagged Values, and Constraints.
- Extension: They extend base metaclasses using the
extendsrelationship. - Organization: Use packages to manage complexity.
- Caution: Avoid over-extension and maintain clear documentation.
By mastering profile diagrams, you gain the ability to build modeling languages that truly fit your organization’s workflow. This leads to clearer communication, better automated processes, and more robust system designs.
Remember, the goal is not to reinvent the wheel, but to improve the tire. Profiles are the tool for that improvement.